(2024.12.22) 수정됨.
당연하지만, matplotlib과 같이 pyqtgraph에서도 선이나 막대에 색상을 입히는게 가능하다.
다만, matplotlib과 비교했을 때 다소 조악하다고 느껴진다.
단색 입히기
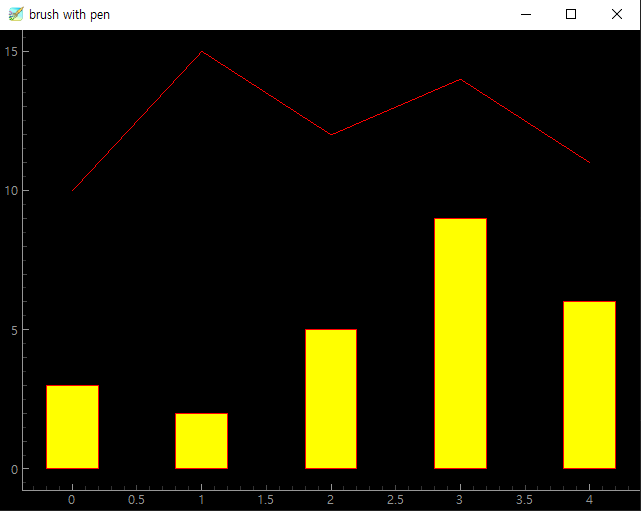
색상은 pen과 brush 2개로 구분되는데, 각각 pen은 외곽선(matplotlib의 edgecolor), brush는 몸통의 색(matplotlib의 facecolor)이다.
PlotDataItem의 경우 선의 색상은 brush가 아닌 pen 인수로 받는다.
import pyqtgraph as pg

list_line = [10, 15, 12, 14, 11]
list_bar = [3, 2, 5, 9, 6]

widget = pg.plot(title='brush with pen')
line = pg.PlotDataItem(list_line, pen='r', width=10)
widget.addItem(line)
bar = pg.BarGraphItem(x=range(len(list_bar)), width=0.4, height=list_bar, brush='y', pen='r')
widget.addItem(bar)

pg.exec()
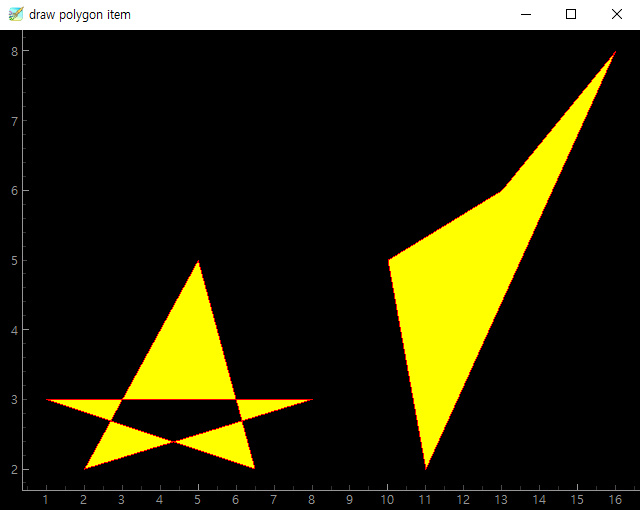
line plot에서 brush의 용도
line plot에서 brush가 아닌 pen을 사용하는 이유는, brush를 fillBrush로 사용하기 때문이다.
도형을 그리고 billBrush 또는 brush 값을 전달한 경우, brush로 전달한 색상은 다음과 같이 도형의 몸통을 그리는데 사용된다.
import pyqtgraph as pg

x = [3, 3, 2, 2, 3, 3, 3, 4, 4, 3]
y = [5, 4, 4, 3, 3, 2, 3, 3, 4, 4]

pg.plot(x=x, y=y, pen='y', brush='r', fillLevel=1)

x = x + [i+4 for i in x]
y = y + [i+2 for i in y]
pg.plot(x=x, y=y, pen={'color': 'y', 'width': 10}, brush='r', fillLevel=0.5)


pg.exec()

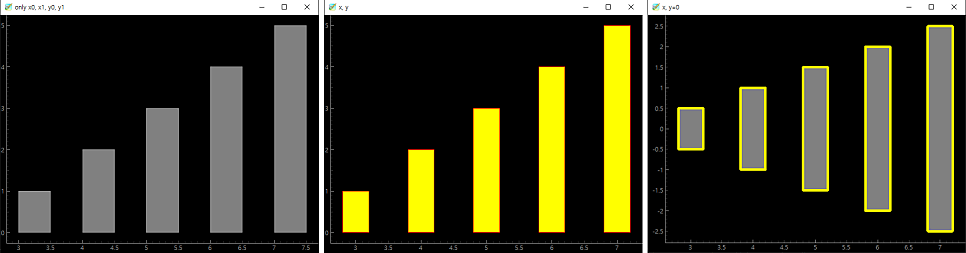
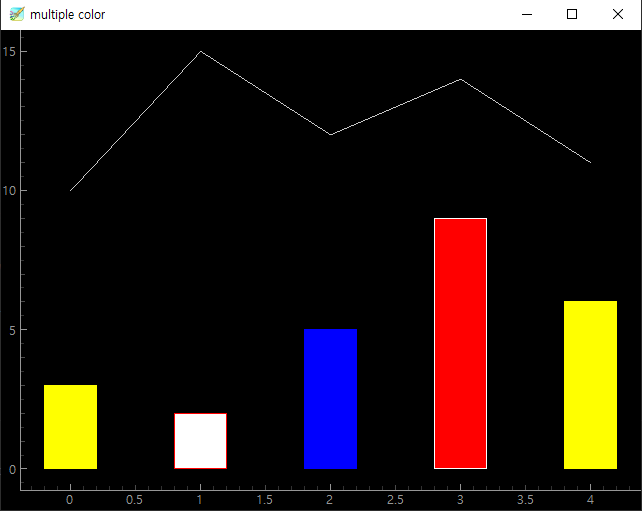
여러 색상 지정하기
한 번에 2개 이상의 색상을 지정하는 것도 가능하다.
외곽선은 pens, 몸통색은 brushes 인수로 전달받는다.
PlotDataItem의 경우 다중 색상을 적용받지 않기 때문에 해당 값으로 인수를 전달하더라도 적용되지 않는다.
import pyqtgraph as pg

list_line = [10, 15, 12, 14, 11]
list_bar = [3, 2, 5, 9, 6]

list_color = ['y', 'w', 'b', 'r', 'y']
widget = pg.plot(title='multiple color')
line = pg.PlotDataItem(list_line, brushes=reversed(list_color), pens=['y', 'w', 'b', 'r', 'y'], width=10)
widget.addItem(line)
bar = pg.BarGraphItem(x=range(len(list_bar)), width=0.4, height=list_bar, brushes=list_color, pens=reversed(list_color))
widget.addItem(bar)
pg.exec()
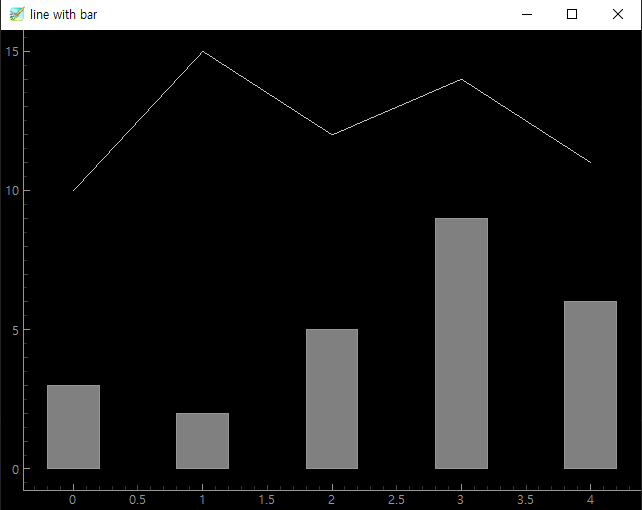
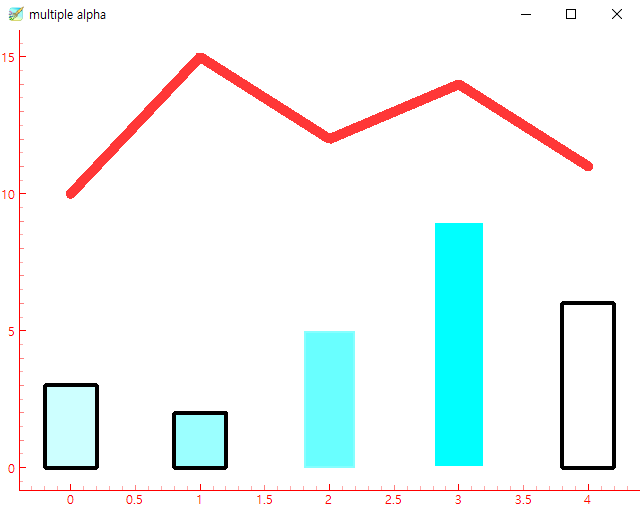
배경 색상 변경 + 투명도 + 선 두께 조절하기
setConfigOption 함수를 통해 배경색과 틱의 색을 조절할 수 있다.
본래는 QtGui.QPen class object를 사용해야 하나, 다음과 같이 str 또는 dict object를 전달하더라도 QtGui.QPen class object로 변환해서 적용한다.
(red, green, blue, alpha) 조합으로 색상을 전달할 수 있는데, 각각 0 이상, 255 이하의 값을 전달해야 한다.
해당 범위가 벗어나면 색상이 적용되지 않는 듯.
pen 옵션에 width 값을 지정하는 것으로 외곽선의 두께를 변경하는 것이 가능하다.
import pyqtgraph as pg

list_line = [10, 15, 12, 14, 11]
list_bar = [3, 2, 5, 9, 6]

# 배경색
pg.setConfigOption('background', 'w')
# tick 색
pg.setConfigOption('foreground', 'r')
linepenstyle = [
    'r', 'g', 'b', 'k', 'y',
]
penstyle = [
    {'color': 'k', 'width': 4, 'alpha': 1},
    {'color': 'k', 'width': 4, 'alpha': 0.2},
    {'color': (255, 255, 255, 50), 'width': 4,},
    {'color': (255, 255, 255, 255), 'width': 4,},
    {'color': 'k', 'width': 4, 'alpha': 255},
]
brushestyle = [
    (0, 255, 255, 50), (0, 255, 255, 100), (0, 255, 255, 150), (0, 255, 255, 255), (0, 255, 255, 256)
]
widget = pg.plot(title='multiple alpha')
line = pg.PlotDataItem(list_line, pen={'color': (255, 0, 0, 200), 'width': 10})
widget.addItem(line)
bar = pg.BarGraphItem(x=range(len(list_bar)), width=0.4, height=list_bar, brushes=brushestyle, pens=penstyle)
widget.addItem(bar)

pg.exec()
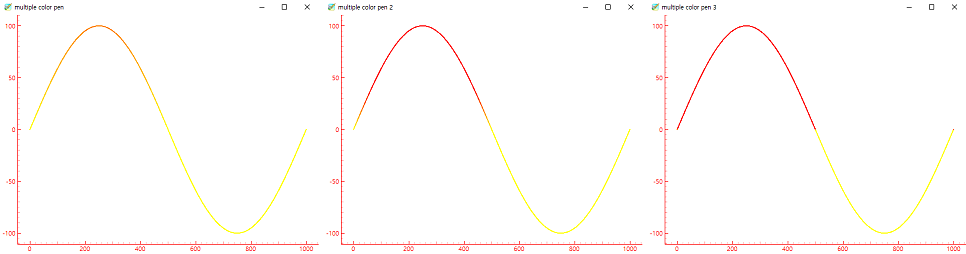
line에 다중 색상 적용하기
ColorMap class를 사용해 그라데이션을 이용한 여러 색상 표현이 가능하다는 듯 하다.
참고 링크 : https://github.com/pyqtgraph/pyqtgraph/issues/1886
import pyqtgraph as pg
import numpy as np

list_line = [10, 15, 12, 14, 11]
list_bar = [3, 2, 5, 9, 6]

# 배경색
pg.setConfigOption('background', 'w')
# tick 색
pg.setConfigOption('foreground', 'r')
list_line = 100 * np.sin(2*np.pi*1.0*np.linspace(0, 1, 1000))
cm = pg.ColorMap(
    # 컬러맵 범위?
    pos=(0, 1),
    # 색상
    color=['y', 'r', 'k'],
)
pen = cm.getPen(
    # 그라데이션 너비
    span=(0, 200),
    # 펜 두께
    width=2,
)
widget = pg.plot(title='multiple color pen')
line = pg.PlotDataItem(list_line, pen=pen)
widget.addItem(line)


cm = pg.ColorMap(
    # 컬러맵 범위?
    pos=(0, 0.2),
    # 색상
    color=['y', 'r', 'k'],
)
pen = cm.getPen(
    # 그라데이션 너비
    span=(0, 200),
    # 펜 두께
    width=2,
)

widget = pg.plot(title='multiple color pen 2')
line = pg.PlotDataItem(list_line, pen=pen)
widget.addItem(line)

cm = pg.ColorMap(
    # 컬러맵 범위?
    pos=(0, 0.2),
    # 색상
    color=['y', 'r', 'k'],
)
pen = cm.getPen(
    # 그라데이션 너비
    span=(0, 0.0001),
    # 펜 두께
    width=2,
)
widget = pg.plot(title='multiple color pen 3')
line = pg.PlotDataItem(list_line, pen=pen)
widget.addItem(line)

pg.exec()